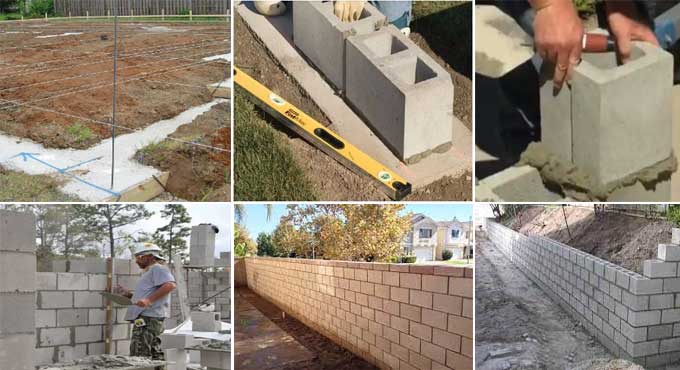
Construction of a Cinder Block Wall
The blocks made of concrete and coal cinders are known as cinder blocks or concrete masonry units. The lack of aggregates and other ingredients present in cinder block units makes them very light compared to other building blocks.
Construction Process of Cinder Block Wall
Layout of Cinder Wall Preparation
String or chalk can use to mark the layout of the cinder block wall. The wall-length needs to finalize. Determine how many blocks are needed to create the wall width to determine how wide the wall will be. The block's measurements use to calculate the block's width.
Make sure the cinder blocks are as close as possible to where you intend to begin the installation. You should not apply too much weight in areas that not design to handle temporary loads.
Estimation
By measuring the square feet of the building, you can estimate the number of cinder blocks needed. An opening is subtracted from the area of walls. To meet any uncertainty in the plan, add some extra material once the estimation has been completed.
Wall Foundation
Cinder block walls are built on a foundation or footing. Foundations must be wide enough to span twice as much as the width of the selected cinder blocks. You begin by calculating the width of the wall, & then calculate the footing area. Ground footings are measured and marked using a tape measure.
Corner Wall Construction
Upon reaching 3 to 4 blocks in height, the straight in-line wall construction can turn. Alternate half blocks must use in either direction to avoid in-line vertical joints. If your corners aren't square and plumb, use a large level to check them.
Construction of First Layer of Cinder Block
Concrete lies on top of the footing surface. Cinder blocks with some texture over them will be better able to adhere to the concrete. Install the cinders along the wall as per the marked layout until the first turn reaches.
From one end to the other, trace the edges of the bricks. Ensure that each side of the cinder block traces. Now take your cinder block out of the wall and place it aside.
A trowel uses to spread mortar within the lines. You spread the mortar 1 inch thick.
Top the mortar layer with the first cinder block. That is placed upright on the mortar mix, & then gently hammered into place.
Two flanges or protrusions on one end of the cinder block need to be mortar together. As a result, the new block can be attached to the existing cinder block by connecting its flanges. Replace the old or base block with the new one. 3/8 inch is the maximum thickness of this mortar joint. Continue repeating this process till the first layer of the cinder block is complete.
Final Touch
Keep the joints clean by wiping away any left-over mortar. Each time you place a block, use this to prevent the mortar from hardening. Take a half or corner block once the straight wall has complete. Mortar should be applied to the footings and protrusions of the half-block.
The base block should place directly on top of it. To continue building the wall, continue to place full blocks along its line. For the second layer, overlapping vertical joints avoid using a corner block.
To ensure the blocks are on a level with the base block, use a level every 10 minutes. Vertically and horizontally, make sure the level is accurate.
The third layer begins with a full cinder block, and the fourth layer begins with a half block and vice versa. Following this procedure will ensure that the wall is strong enough. Last but not least, use a sledgehammer or mallet to solidify the mortar joints.
Drawbacks
The fact that they have less strength and cost a lot makes them unsuitable for many places.
Wrapping it Up
As a result, they have limited capabilities to undergo buckling or bowing repairs under a large load. A sufficient amount of reinforcement is provided to ensure a solid installation of the blocks.
To learn more, watch the following video tutorial.
Video Source: QUIKRETE