Concrete Roof Waterproofing: Preserving Your Property's Integrity

A concrete roof, known for its durability and longevity, is a popular choice for many homeowners and commercial property owners. However, over time, even the toughest concrete roofs can succumb to water damage, cracks, and leaks. This makes it crucial to consider waterproofing to maintain the structural integrity of your concrete roof and ensure a dry and secure interior.
In this comprehensive guide, we will delve into the importance of waterproofing old concrete roofs, the best sealants for flat concrete roofs, and provide a step-by-step process for waterproofing a concrete roof.
The Importance of Waterproofing an Old Concrete Roof
Over the years, exposure to various weather conditions, temperature fluctuations, and the natural settling of the building can cause concrete roofs to develop cracks, which allow water to seep in. Here are some reasons why waterproofing an old concrete roof is essential:
1. Preventing Structural Damage
Water infiltration through cracks and leaks can weaken the concrete structure of the roof over time, potentially leading to expensive repairs or even a complete roof replacement.
2. Protecting Interior Spaces
Water damage from a leaking roof can cause costly damage to the interior of your property, including walls, ceilings, insulation, and valuable possessions.
3. Avoiding Mold and Mildew
Persistent moisture from leaks can create an ideal environment for mould and mildew growth, which can harm your health and require expensive remediation.
4. Energy Efficiency
Water infiltration can reduce the insulation properties of your roof, leading to increased energy consumption and higher utility bills.
5. Extending Roof Lifespan
Proper waterproofing can significantly extend the lifespan of your concrete roof, providing long-term cost savings and peace of mind.
Choosing the Right Sealant for Flat Concrete Roofs
Selecting the appropriate sealant for your flat concrete roof is crucial for effective waterproofing. Here are some common sealant options to consider:
1. Elastomeric Coatings
A Advantages: Elastomeric coatings are highly flexible and can expand and contract with temperature changes. They create a seamless, watertight barrier when applied correctly.
B. Best For: Flat concrete roofs with minor cracks and a need for a flexible, long-lasting solution.
2. Bitumen Membranes
A. Advantages: Bitumen membranes are durable and provide excellent waterproofing protection. They are available in various forms, including self-adhesive sheets and hot-applied materials.
B. Best For: Flat concrete roofs with larger cracks or more extensive damage.
3. Polyurethane Coatings
A. Advantages: Polyurethane coatings offer excellent waterproofing and UV resistance. They are ideal for roofs that require added protection from sun exposure.
B. Best For: Flat concrete roofs in sunny or high-UV areas.
4. Silicone Coatings
A. Advantages: Silicone coatings provide exceptional UV resistance and durability. They also resist ponding water effectively.
B. Best For: Flat concrete roofs in areas prone to standing water or with significant exposure to sunlight.
The Process of Waterproofing a Concrete Roof
Now, let us explore the step-by-step process for waterproofing a concrete roof:
Step 1: Surface Preparation
A. Clean the Roof: Remove any debris, dirt, or loose materials from the concrete roof's surface. This task can be accomplished with the help of a pressure washer.
B. Repair Cracks: Inspect the roof for cracks and gaps. Use concrete patching compound to patch up cracks and holes. Before proceeding, let the patch completely dry.
Step 2: Primer Application
A. Apply a Primer: Using a paint roller or sprayer, apply a suitable primer to the entire roof surface. The primer enhances adhesion and ensures a proper bond between the concrete and the waterproofing material. Make sure the primer dries according to the manufacturer's instructions.
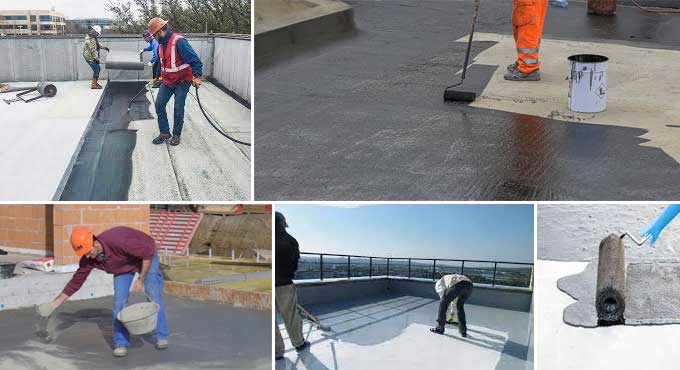
Step 3: Apply the Waterproofing Material
A. Start at the Edges: Begin by applying the chosen waterproofing material along the edges and perimeter of the roof. This ensures a secure seal in vulnerable areas.
B. Field Application: Once the edges are sealed, apply the waterproofing material across the entire roof surface. Follow the manufacturer's guidelines for the specific product you are using, as application methods can vary.
C. Layering: Depending on the product, you may need to apply multiple layers for effective waterproofing. Allow each layer to dry or cure before applying the next one.
D. Reinforce Seams and Joints: Pay special attention to seams, joints, and areas with potential stress points. Apply extra layers or reinforcement materials as needed.
Step 4: Inspect and Test
A. Inspect the Work: After completing the application, carefully inspect the entire roof to ensure there are no missed spots or defects in the waterproofing material.
B. Conduct a Water Test: If possible, perform a water test by gently flooding the roof with water. Check for any signs of leakage or areas that may need additional attention.
Step 5: Final Touches
A. Allow for Curing: Give the waterproofing material adequate time to cure and form a seamless, protective barrier. This curing time can vary depending on the product used and environmental conditions.
B. Apply a Top Coat (Optional): Some waterproofing systems may require a top coat for added durability and UV protection. Consult the manufacturer's instructions for guidance.
Step 6: Regular Maintenance
A. Schedule Inspections: To ensure the ongoing effectiveness of your waterproofing, schedule regular inspections of your concrete roof. Look for any signs of wear, damage, or deterioration.
B. Perform Necessary Repairs: If you notice any issues during your inspections, address them promptly by making necessary repairs or reapplying the waterproofing material as needed.
Conclusion
Waterproofing an old concrete roof is a proactive and cost-effective measure to protect your property from water damage, extend the lifespan of your roof, and maintain a comfortable, dry interior. Choosing the right sealant for your flat concrete roof and following the step-by-step waterproofing process outlined in this guide will help you achieve a reliable and long-lasting solution.
To learn more, watch the following video tutorial.
Video Source: the Resin and Membrane centre
Remember that regular maintenance and inspections are key to preserving the integrity of your waterproofed concrete roof and ensuring its continued performance. By taking these proactive steps, you can enjoy the benefits of a well-protected and watertight roof for years to come, safeguarding your valuable investment.