How to Install a Toilet Properly
Toilet leakage and its related issues can not be captured without any problem. More consideration ought to be taken in introducing the Toilet and its related segments.
In the wake of the leakage of Toilet, arresting it is nearly impossible. Need to wreck the whole work and supplant it with a new one. So care ought to be taken in the beginning time of development like giving sunken slab, Fixing pipe, fixing storage room.
On the ground floor some essential ability is sufficient to introduce a Toilet. Be that as it may, in multistory structure (in the first or second floor), more consideration is required.
Right now, we will inform you concerning Installation of Toilet in first floor development.
Here we need to clarify what is the organization of Installation of a Toilet with reference pictures. On the off chance that we follow this request with care, nearly we can stop the leakage of Toilet.
Stage 1: Ascending of column up to ground floor rooftop (IE base of Sunken slab). Making of centring and covering work.
Stage 2: Laying of Reinforcement for base and side wall concrete. Place the spread square aimlessly and keep up the successful clear spread at base and side moreover. Supplement the side wall reinforcement in the column to capture the leakage through the column.
Stage 3: Giving Sunken slab concrete at base. Use admixtures like water sealing operator and keep up mixture ratio of 1:11/2:3 (M20 grade). sand ought to be spotless as could be expected under the circumstances.
Ensure that sand is screened through sifter and separated from sediment and undesirable minerals. Mixture of total ought to be half 10 mm in addition to half 20 mm. So that we can accomplish an appropriate blend. At that point no one but we can make the solid without nectar comp voids.
Stage 4: Giving half brick wall at external edge as covering. concrete mortar ratio must be 1:4. sand ought to be spotless as could be expected under the circumstances.
Ensure that sand is screened through sifter and separated from sediment and undesirable minerals.Curing of wall for at least 7 days. After that we can continue our next work.
Stage 5: Giving Sunken slab concrete at the side. All consideration must be followed as of now said at bottom slab placing.Use admixtures like water sealing operator and keep up mixture ratio of 1:11/2:3 (M20 grade).
The sand ought to be spotless as could reasonably be expected. Ensure that sand is screened through sifter and separated from sediment and undesirable minerals. Mixture of total ought to be half 10 mm in addition to half 20 mm. So that we can accomplish an appropriate blend.
At that point no one but we can make the solid without honeycomb voids. Place both side wall cement and column concrete on the same day with no joint.
Stage 6: Furnishing all the corners with decrease arrangement with brick workmanship to frame a bend or decrease so as to capture leakage at corner.
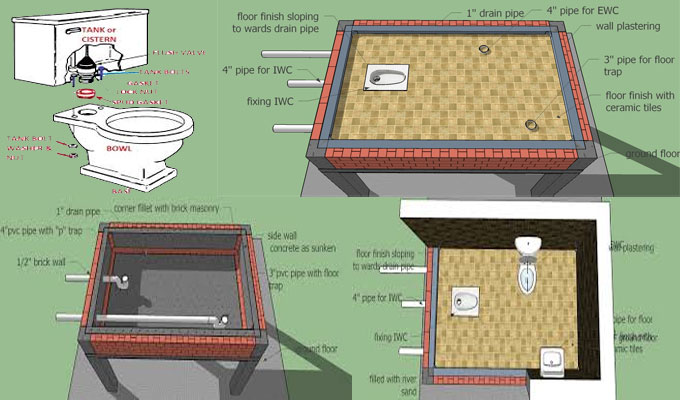
Stage 7: Give gaps to embeddings the sterile funnels for IWC, EWC and floor trap. Fix the necessary channels appropriately. Capture the openings with care and ensure that there is no leakage.
Stage 8: Subsequent to fixing the funnel, make putting for both side and base solid wall all the while with no joint. utilize appropriate water sealing specialists. The base floor completing must have inclining toward the 1'' pipe.
Since, if any leakage from joints of funnel, joint from tile, the released waste will be arranged consequently through this channel pipe without damping the wall. This is the reason for the little channel pipe.
This little funnel fills in as the protected gatekeeper for the whole Toilet establishment. It keeps the whole sunken slab from harm. you can comprehend by following the beneath image.
Stage 9: In the wake of making wall putting, Place Fix P trap and floor Trap and guarantee the correct degree of the pipe. Now close the external finish of all pipes with seal and top the water off to the highest point of P trap and floor trap and leave for 24 hours.
Following 24 hours, Check for any leakage. Watch the 1'' channel pipe for any stream.. In the event that there is any hole and water stream from the channel pipe, supplant the funnel work until leakage is captured.
Subsequent to getting affirmation, we can continue the following work. In the event that you don't take care right now, the toilet framework needs to be kept up for lifetime. So stage 9 procedure is a significant advance.
Stage 10: Subsequent to checking the leakage, First supplement the IWC into the p trap and apply the mortar around the Joint.( Joint methods P trap and IWC meeting point).
Fill the staying sunken slab with waterway sand up to the tallness of PCC. Combine the waterway sand with water and slam it.
Stage 12: Give the PCC 1:4:8 to a base thickness of 5''. Better to utilize broken bricks for total. since it won't harm the pipes. At the top of pcc, flooring with cm 1:3 with appropriate water sealing specialist ought to be laid.
Stage 13: Laying of Ceramic or other floor finish appropriately ought to be made up to the highest point of IWC and slanting of tile finish must towards the floor trap to pass on the water.
Presently it?s time to fix other EWC , wash bowls and other taps and so forth. This is the whole methodology to introduce a toilet. We hope it was useful to you. Please let us know of your thoughts and suggestions!