Pouring Concrete Footings for Retaining Walls: A Guide to Measuring and Achieving Optimal Depth
What is the best way to pour concrete footings for a retaining wall?
To ensure stability and durability, concrete footings for retaining walls must be carefully planned and executed. Pour concrete footings for retaining walls by following these steps:
1. Determine the dimensions: Start by measuring and marking the layout of the retaining wall on the ground. Calculate the dimensions for the footings based on the height and length of the wall, as well as any additional factors such as soil conditions and the weight the wall will bear.
2. Excavate the area: Use a shovel or an excavator to dig the trench for the footings. The depth and width of the trench should correspond to the planned dimensions of the footings. Make sure the trench is level and the sides are smooth.
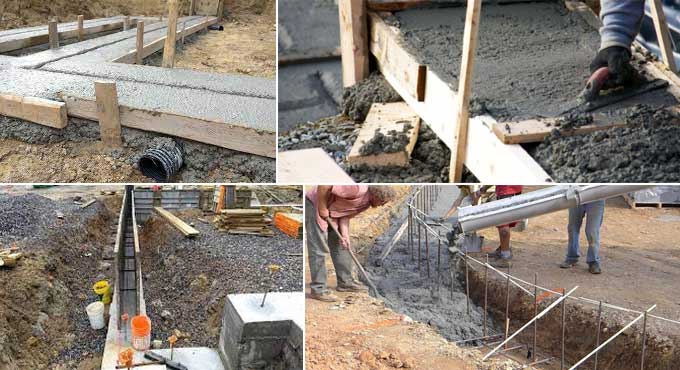
3. Install formwork: Construct sturdy formwork along the trench to contain the concrete. Use straight boards or specialized forms designed for retaining walls. Ensure that the formwork is properly aligned, level, and securely braced to prevent any shifting during the pouring process.
4. Prepare the base: Before pouring the concrete, ensure the base of the trench is firm and well-compacted. Remove any loose soil or debris and use a compactor or hand tamper to compact the soil evenly. This provides a stable foundation for the footings.
5. Reinforcement: Depending on the design and engineering requirements, consider adding reinforcement to the footings. This can be achieved by placing steel reinforcement bars rebar or within the formwork. The rebar should be positioned to provide strength and prevent cracking.
6. Mix and pour the concrete: Prepare the concrete mix according to the manufacturer's instructions or hire a concrete supplier for ready-mix concrete. Pour the concrete into the formwork, ensuring it fills the entire trench evenly. Use a shovel or a concrete vibrator to remove air pockets and consolidate the concrete.
7. Smooth and level the surface: After pouring the concrete, use a screed board or a straight piece of lumber to level the surface of the footings. Move the screed board in a back-and-forth motion across the top of the formwork, removing excess concrete and creating a level finish.
8. Cure and protect the footings: Once the footings are poured and levelled, cover them with a plastic sheet or use a curing compound to retain moisture and promote proper curing. Follow the curing instructions provided by the concrete manufacturer to ensure the footings gain strength and durability over time.
What are some safety precautions to take when pouring concrete footings for a retaining wall?
Here are some safety precautions to take when pouring concrete footings for a retaining wall:
A. Wear safety glasses and gloves.
B. Use caution when working with concrete, as it can be slippery.
C. Be aware of the weight of the concrete and make sure that the footing trenches are strong enough to support it.
How to do Retaining Wall Footing Measurement?
Measuring a footing for a retaining wall accurately is crucial to ensure the stability and integrity of the structure. Follow these steps to measure a footing for a retaining wall:
1. Determine the wall dimensions: Begin by determining the desired dimensions of your retaining wall, including its height, length, and width. These measurements will help you calculate the appropriate size for the footings.
2. Consult local building codes and regulations: Before proceeding with your measurements, consult your local building codes and regulations regarding retaining walls. They may specify certain requirements, such as minimum footing dimensions based on the height and type of the wall.
3. Calculate the footing size: The size of the footing depends on various factors, including the height of the wall, the type of soil, and the load the wall will bear. As a general guideline, a common practice is to make the footing width at least twice the width of the wall. However, it is best to consult with a structural engineer or follow local guidelines for precise calculations.
4. Determine the footing depth: The footing depth is determined by the frost line in your region and the stability of the soil. It is the depth below the ground where freezing occurs that is called the frost line. In colder climates, footings must extend below the frost line to prevent damage from freezing and thawing. The stability of the soil also affects the depth, as it should reach stable, load-bearing soil layers. Consult with a local engineer or building department to determine the appropriate footing depth for your specific location.
5. Mark the footing layout: Once you have calculated the width and depth of the footing, mark the layout on the ground using stakes, string lines, or spray paint. Ensure the lines are straight, level, and accurately reflect the dimensions of the planned retaining wall.
6. Adjust for slope and batter: If your retaining wall includes a sloped or battered design, consider adjusting the footing measurements accordingly. The footing dimensions may vary based on the angle and degree of the slope or batter. Ensure that the footing accommodates the specific design requirements.
7. Double-check the measurements: Before proceeding with excavation, double-check your measurements to ensure accuracy. Take additional measurements to verify the dimensions and confirm that they align with your design plans.
When building a retaining wall, how deep should the footings be?
When building a retaining wall, the depth of the footing is a critical factor in ensuring the stability and structural integrity of the wall. The depth of the footings is determined by several factors, including the height of the wall, the type of soil, and local building codes. Here are some general guidelines for footing depth:
1. Frost line: In regions with freezing temperatures, it is essential to extend the footings below the frost line. The frost line is the depth at which the ground freezes during the coldest part of the year. By going below the frost line, you prevent the freezing and thawing of the soil from exerting pressure on the retaining wall, which could lead to movement and potential failure. The specific depth of the frost line varies depending on the climate and location, so it is important to consult local building codes or contact a professional to determine the frost line depth in your area.
2. Soil stability: The depth of the footings should reach stable soil layers that can adequately support the weight of the retaining wall. The load-bearing capacity of soil varies according to its type. If the upper layers of the soil are loose or prone to erosion, it is crucial to excavate down to a more stable soil layer. This helps distribute the weight of the wall evenly and prevents settling or shifting over time. A geotechnical engineer can assess the soil conditions and provide recommendations on the appropriate depth for the footings based on soil stability.
3. Engineering requirements: For taller retaining walls or walls that will bear significant loads, it is common to follow specific engineering guidelines and calculations to determine the footing depth. These guidelines take into account factors such as soil properties, wall height, slope angle, and surcharge loads. Consulting with a structural engineer or following local building codes is essential in such cases to ensure compliance with safety standards and to determine the appropriate depth for the footings.
To learn more, watch the following video tutorial.
Video Source: Keystone Industries Inc - All About Concrete
What are the tools required for Poring Concrete for Retaining Walls?
Here is a list of tools required for pouring concrete for retaining walls:
A. Concrete mixer: This is used to mix the concrete. If you do not have a concrete mixer, you can rent one from a local hardware store.
B. Wheelbarrow: This is used to transport the concrete from the mixer to the footings.
C. Shovel: This is used to spread the concrete in the footings.
D. Tamp: This is used to compact the concrete and remove any air bubbles.
E. Level: This is used to ensure that the concrete is level.
F. Straightedge: This is used to smooth the surface of the concrete.
G. Water hose: This is used to wet the concrete and prevent it from drying out too quickly.
H. Safety glasses: These protect your eyes from concrete dust and debris.
I. Gloves: These protect your hands from concrete and sharp objects.