Removing Texture from Walls: Tips and Techniques for a Smooth Finish
When it comes to home improvement projects, few tasks can transform the look and feel of a room as dramatically as removing texture from walls. Whether you're dealing with outdated popcorn ceilings or textured walls that have seen better days, achieving a smooth finish can breathe new life into your living space.
Why Remove Texture from Walls?
Before diving into the process of removing texture from your walls, it's essential to understand why you might want to undertake this project. Here are some common reasons homeowners choose to remove wall texture:
1. Modernization:
Textured walls and ceilings, popular in the past, can give your home a dated appearance. Removing the texture is an effective way to update your space and bring it into the 21st century.
2. Aesthetic Enhancement:
Smooth walls create a clean and sophisticated look that can make your rooms feel more spacious and inviting. They also serve as a versatile backdrop for various decorating styles.
3. Repair and Maintenance:
Textured surfaces can hide imperfections, making it challenging to identify and address issues like cracks or water damage. Smoothing the walls allows for easier detection and repair of such problems.
4. Improved Lighting:
Textured surfaces can cast shadows and unevenly disperse light, reducing the overall brightness of a room. Smoother walls reflect light more evenly, brightening your space and making it feel more open.
Now that we understand the benefits of removing wall texture, let's move on to the tools and materials you will need to get started.
Tools and Materials
Before you begin your texture removal project, gather the following tools and materials:
Tools:
1. Safety Gear: Safety glasses, dust mask, and gloves to protect yourself from dust and debris.
2. Utility Knife: Used for scoring and cutting through the texture.
3. Putty Knife: For scraping off the texture.
4. Drywall Joint Compound: Used for patching and smoothing the walls.
5. Sanding Blocks or Electric Sander: For smoothing the walls.
6. Dust Containment: Plastic sheets, drop cloths, and painter's tape to cover floors and furniture.
7. Ladder or Scaffold: Depending on the height of the walls and ceilings.
8. Spray Bottle: To moisten the texture for easier removal.
Materials:
1. Drywall Patching Materials: Joint tape and joint compound.
2. Primer: To prepare the walls for a smooth finish.
3. Paint: For the final coat.
Step-by-Step Texture Removal
Now that you have your tools and materials ready, let us dive into the step-by-step process of removing texture from walls and achieving a smooth finish.
Step 1: Preparation
a. Clear the Room: Start by removing all furniture from the room or covering it with plastic sheets. Use painter's tape to secure the sheets and protect the floor as well.
b. Turn Off Electricity: For safety reasons, switch off the electricity to any outlets or fixtures on the walls and ceiling you will be working on.
Step 2: Safety Gear
Ensure you are wearing safety glasses, gloves, and a dust mask. Wall texture removal can generate a significant amount of dust and debris, so it's crucial to protect yourself.
Step 3: Score the Texture
Use a utility knife to score the texture lightly. The surface needs to be cut in shallow crisscross patterns. This step helps the moisture penetrate the texture more effectively in the next step.
Step 4: Moisten the Texture
Fill a spray bottle with water and lightly mist the textured surface. About 15 minutes after adding the water, allow it to soak in. This will soften the texture, making it easier to remove.
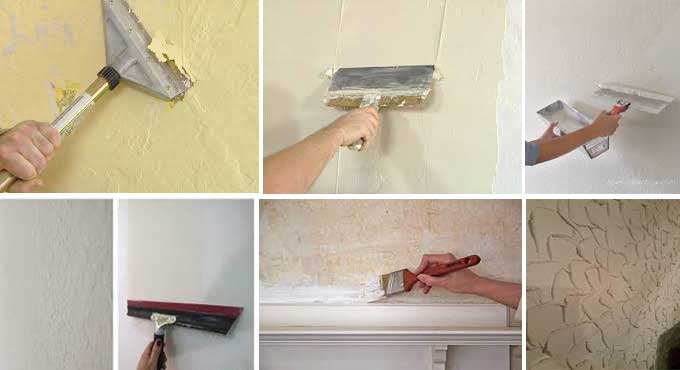
Step 5: Scrape Off the Texture
Using a putty knife, begin scraping off the softened texture. Start in one corner and work your way across the wall systematically. Be patient, and take your time to ensure you remove all of the texture.
Step 6: Repair Any Damage
After removing the texture, inspect the walls for any imperfections or damage. Use drywall joint compound and joint tape to patch any holes, cracks, or uneven spots. The compound should be mixed and applied according to the instructions provided by the manufacturer.
Step 7: Sand the Walls
Once the joint compound has dried, sand the walls using a sanding block or an electric sander. The smoothness of a finish depends on sanding. Start with a coarse-grit sandpaper and progress to finer grits until the walls are perfectly smooth.
Step 8: Prime the Walls
A primer coat should be applied to the walls before painting. Primer helps the paint adhere evenly and covers any remaining imperfections. Be sure to choose a primer that's suitable for your wall surface.
Step 9: Paint the Walls
The primer must be dried before painting can begin. Choose high-quality paint in the colour of your choice. Apply at least two coats, allowing sufficient drying time between coats. By doing this, you will ensure a durable and even finish.
Step 10: Clean Up
Remove any plastic sheets and painter's tape. Reinstall electrical fixtures and furniture in the room. Dispose of debris and clean your tools thoroughly.
Tips and Techniques for a Flawless Finish
Achieving a smooth finish on your walls involves more than just following the basic steps. Here are some additional tips and techniques to help you achieve a flawless result:
1. Test a Small Area First
Before tackling the entire room, it's a good idea to test the texture removal process on a small, inconspicuous area. This allows you to get a feel for the tools and materials and assess the condition of your walls.
2. Take Breaks
Removing texture can be a physically demanding task, especially if you're working on ceilings. Take regular breaks to avoid fatigue and maintain your focus on achieving a smooth finish.
3. Use Quality Tools
Investing in high-quality tools, such as a sharp utility knife and a reliable putty knife, can make the job much easier and more efficient.
4. Be Patient with the Patching and Sanding
The key to a smooth finish is meticulous patching and sanding. Don't rush through these steps; take your time to achieve a seamless result.
5. Apply Thin Coats of Joint Compound
When patching imperfections, it's better to apply multiple thin coats of joint compound rather than one thick coat. Thin coats are easier to sand and result in a smoother finish.
To learn more, watch the following video tutorial.
Video Source: Vancouver Carpenter
6. Sand in Multiple Directions
When sanding the walls, sand in multiple directions (up and down, side to side) to ensure that you remove any uneven spots and create a uniform surface.
7. Choose the Right Paint Finish
If you want your walls to have a certain level of sheen, take that into consideration. Flat or matte finishes tend to hide imperfections, while satin or semi-gloss finishes are easier to clean and more reflective.
8. Proper Lighting
Inspect your walls under different lighting conditions to ensure you've achieved a truly smooth finish. Natural daylight and various room lighting can reveal imperfections that might go unnoticed otherwise.
9. Seek Professional Help if Necessary
If the texture on your walls is exceptionally challenging to remove or if you're unsure about your DIY skills, it may be best to hire a professional contractor. They have the experience and tools to handle even the most difficult texture removal jobs.
Conclusion
Removing texture from walls and achieving a smooth finish can be a rewarding home improvement project that transforms the look and feel of your living space.
With the right tools, materials, and techniques, you can create a modern and inviting environment that reflects your personal style. Remember to prioritize safety, take your time, and pay attention to detail to ensure a flawless result that you can enjoy for years to come.
Whether you are modernizing your home, addressing imperfections, or simply seeking a fresh look, the process of texture removal and wall smoothing is a valuable skill that can enhance the beauty and functionality of your living space.