The Ultimate Guide to Roof Vents and its types
Keeping your roof ventilated is essential to maintaining its integrity. You can reduce energy costs and prolong the life of your roof by installing roof vents in addition to improving air circulation.
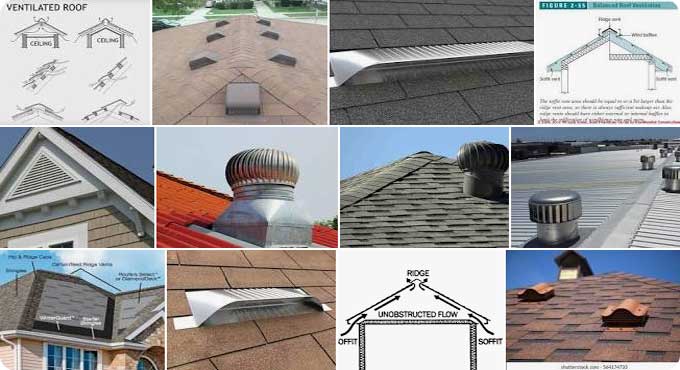
Varieties of Roof Vents
1. Turbine Vents
Roof turbines commonly referred to as whirlybirds or turbine vents are crucial for maintaining a building's adequate ventilation. Turbine vents are air exhausts that are positioned on a building's roof to promote air exchange. Turbine vents are helpful in both business and residential settings because they provide natural air ventilation, which lowers energy expenditures.
An aerodynamic turbine vent is composed of a cylindrical housing with an attached wind turbine. Wind turbines are designed to spin in the wind, creating updraft vents. Through the vent, the exhaust air is pulled out of the building by the spinning turbine, which causes an increase in air pressure inside the housing. Without fans or other systems, this is an efficient way to exhaust air from a building.
2. Wind Turbines
The use of wind turbines is one of the most popular methods of generating renewable energy. A generator generates electricity by spinning a generator using the wind's power. Ridgelines and open plains with good wind resources are places where wind turbines are installed.
Wind turbine blades capture kinetic energy and convert it into mechanical energy. Electricity is produced by turning a generator with this mechanical energy. Various uses can be made of the electricity produced by wind turbines by connecting them to a power grid.
Compared to other renewable energy sources, wind turbines have several advantages. It differs from other forms of renewable energy, such as solar energy, in that they do not require fuel to generate electricity.
3. Gable Vents
Gable vents have a number of uses, but they are usually used to keep the attic and home cool in the summer. Gable vents assist in controlling the temperature in the attic, which might otherwise grow too hot and harm the materials thereby allowing hot air to exit and cooler air to enter. In the winter, they can aid in preventing snow from accumulating on the roof and melting into the attic.
Additional ventilation offered by gable vents helps prevent moisture buildup that might harm the structure of the house. They also lessen the possibility of mould and humidity growing in the attic.
What is the process of roof ventilation?
Ventilation is essential to ensuring your roof is properly ventilated. There will usually be intake vents installed in the overhangs of the roof at the bottom. It is common for exhaust vents to be located near the roof's peak.
Air is continuously circulated throughout the attic thanks to these two vents. By bringing in cool outside air and exhausting warm, humid air, the hot air will rise and escape through the intake vents, while the cooler air gets drawn into the intake vents.
It is ideal to have an equal amount of both types of vents to allow the air to freely circulate in the space. You should have a few more intake vents than exhaust vents if you cannot install equal amounts of vents. A small amount of pressure is created here, which allows the air to flow nicely. According to most building codes, every 150 square feet of attic floor space must have one square foot of ventilation.
In an attic with a large volume and a steep pitch, ventilation may be necessary. Maintaining a properly ventilated attic and roof is one of the best ways to maintain a comfortable home.
Installing Roof Vents: Step-by-Step Instructions
Whenever a roofing project involves ventilation, roof vents can be an essential component. By reducing heat buildup in the attic, extending the life of your roof, and reducing energy costs, roof vents provide effective and efficient ventilation. The steps for properly installing roof vents are listed below.
1. Identify the type of vent: The appropriate vent type must be chosen before installing roof vents. Recognize the many vent kinds that are available and select the one that best suits your specific roofing requirements. Vents are available in a variety of forms, sizes, and materials, including galvanised steel, aluminium, and plastic. After selecting the appropriate vent type, you may begin the installation procedure.
2. Take a proper measurement and cut a hole: It is time to mark and cut the hole for the vent once you have decided on its size and kind. Utilize a level and take measurements of the area where the vent will be placed to make sure it is properly positioned. Make sure the edges are smooth while cutting the vent hole using a jigsaw.
3. Fill the Hole with the Vent: The vent should be placed in the hole and should be level and secure. Flashing or roofing cement should be used to seal the edges of the vent. Galvanized nails should be used to secure the vent.
To learn more, watch the following video tutorial.
Video Source: G.G.Selvam Architect
4. Make sure the edges are sealed: Make sure the vent edges are properly sealed to prevent water leaks. Ensure the vent is not cracked or broken by using chalk around its perimeter.
5. The screen needs to be installed: A screen over the vent can prevent animals and garbage from entering the attic. A properly attached and sealed screen is essential.
6. Test out the roof vent: The fan should be turned on after the vent has been installed to test it. The fan should be operational, and the vent should not be leaking. The screws should be adjusted or the edges should be sealed with additional cement if the vent leaks.